Monday, May 29, 2017

Memorial Day 2017


Remembering today and every day my dear family
Daddy, Mom, and my brothers Jerry and Danny.

Monday, May 15, 2017

Pralines, Pigs, and Stack Quilt Pattern


Praline making has always been a specialty of my husband, but over the years he has gradually entrusted me with his recipe. Although his recipe is pretty much perfect, I am not, so there are times that "soft-ball stage" becomes either too gooey or too hard. Since his Mom has a bit of dementia, doesn't like to shop, and loves sweets, we decided to make pecan pralines for her Mother's Day gift. And this time they turned out perfectly. She loves them! These stick pretty close to my earlier versions (here and here); I just added more pecans, less butter, more vanilla - I tweak a little each time! Be forewarned: I guarantee a sugar high.

Pecan Pralines
Yields about 2 dozen

2-1/2 cups firmly packed brown sugar (I use dark)
1/2 cup white sugar
1 cup half and half (can use evaporated milk)
2 tablespoons corn syrup
1/2 stick salted* butter (4 tablespoons)
2 cups whole or coarsely chopped toasted pecans
2 teaspoons vanilla
*If you don't use salted butter, add 1/8 teaspoon salt

In 3-quart saucepan, bring first 3 ingredients to a boil over medium heat, stirring constantly. Reduce heat to medium low and cook, stirring occasionally, until candy thermometer registers 238 – 240 degrees, or soft-ball stage.

Remove pan from heat and add butter; do not stir. Let stand until candy thermometer reaches 150 degrees. Add pecans and vanilla.

Using wooden spoon, stir vigourously until candy begins to thicken. This may take awhile. Drop mixture with a tablespoon onto waxed paper. Let stand until firm.

(If mixture thickens too quickly, put pan on low heat and stirs until mixture warms and become more liquid again.)


You know how you see an Instagram photo and making it becomes an obsession? That happened to me with Modern Handcraft's "Stack Quilt". I really don't consider myself a modern gal, but I am finding more and more that modern patterns appeal to me. In this case I was thrilled when the pattern was released, AND I received a 20% discount by using a code that was sent for signing up for Nicole's newsletter. I love the blue denim version, as pictured here, but you can make the denim part white, and there is a whole new look. The discount is good through Wednesday, May 17, so if you are interested go to her website and sign up for her newsletter!


"In other news", we now live in an area that is often beset with feral hogs. I have seen them three times in the yard during the day. They always take off running when I clap my hands. But recently they have been rooting in the yard at night (see picture above). We live on 5 acres with my husband's sister, mother, and nephew, and their yard is also being torn up. The hogs are looking for grubs, roots, bulbs, mushrooms, and grass, and they leave holes in the ground and larger areas that look like they have been roto-tilled. One night my nephew forgot to burn the trash, and the hogs ravaged two trash bags. Feral hogs are not protected, but we really don't want to pay to trap them and have someone remove them, nor do we want to start shooting at them at night (not a good time to shoot a gun). So we are exploring different ways to discourage them. Ah, the joys of country living!

Wednesday, May 3, 2017

Herringbone Baby Quilt


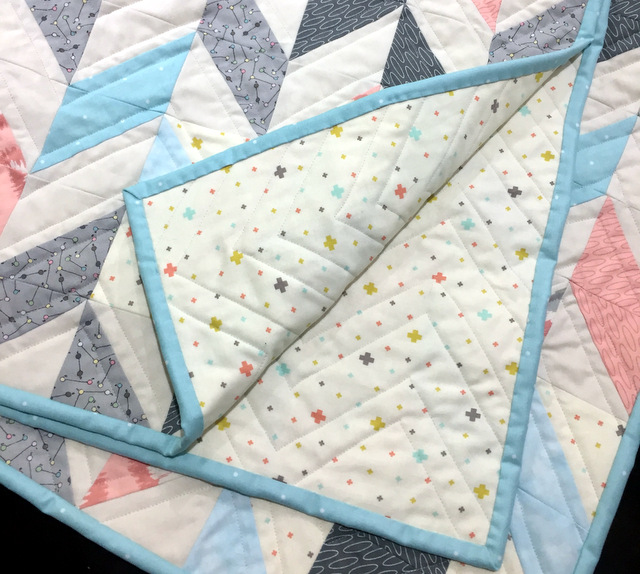
After my great-niece received the quilt for my great-great nephew River, she asked if I would make a quilt for her to give to a friend that was having a baby girl this month. Of course I would! After a few back and forth emails about patterns, she chose the herringbone pattern. Her friend's nursery decor is blush, cream, aqua, grey, and touches of gold with flamingos, pineapples, giraffes, and other animals, but I found it difficult to find coordinating fabrics and colors with those elements, so I decided to just stick with the colors she wanted.

I looked at several patterns for herringbone quilts and finally decided to use a
YouTube video tutorial by Jenny of Missouri Star Quilt Company to make HSTs (half square triangles) that are sewn together for the "chevron" shapes. Her method is to place two squares wrong sides together and sew a 1/4-inch seam completely around them, then cut them into quarters. This is the simplest and fastest method I've used, and I really enjoyed it! I included a few of my photos below. Click on the photos for larger detail.

Take two squares fabric, place right sides together (mine were 5-inch squares)

Sew 1/4 inch seam all the way around. Jenny sews "right off the edge"
instead of pivoting, so I did that also.

Take the sewn squares, place ruler on diagonal, and cut. Without shifting,
turn squares and cut on diagonal again. (A rotating cutting mat helps!)

The yield is four HSTs. Press seams toward darker fabric;
cut off "tips" (mine are still in place in the photo!)

Rotate HSTs to form herringbone pattern.

I made about 24 each of six different prints and one solid for the HSTs (I had several leftovers). I arranged them all on my design board so that one vertical row was "up" and the other vertical row was "down". Then I numbered each row and sewed them by horizontal row. Jenny sewed hers by vertical row, so the choice is whatever makes the most sense to you!


I tried shopping online for the combination of colors but finally ended up at my LQS to ask for help. I was directed to the Serenity fabric line by Amy Ellis for Moda and ended up buying yardage as well as the layer cake (which was 50% off!) I had not seen this line before, and I really love it.


Backing - Desert Bloom - Mesa Ivory by Sherri McConnell

Diagonal quilting to showcase the fabric and herringbone pattern


Quilt size: 39w X 43h
Fabrics: Serenity, Marbles Mist, Meow or Never, Bella Ivory - all by Moda
Backing: Desert Bloom Mesa by Moda
Binding: Aqua with white polka dots by Hobby Lobby
Thread: Superior So Fine #50 Genoa Gray

TUTORIAL OUTTAKES - Kitty helper Rosie stealing an HST

Thursday, March 16, 2017

Quilted Scrappy Tote Bag

This scrappy tote bag is now my go-to shopping bag! I found the tutorial on the blog of Jedi Craft Girl.

I got the idea for scrappy panels from Andy at A Bright Corner. I love this version!

Since this was my first time making a bag I had to go slow and re-read instructions. That being said I had trouble understanding how everything went together and sewed the handles in wrong. Then I got to rip stitches - lol!

I had a piece of Echino Buck with Glasses by Etsuko Furuya for Kokka in canvas that I had been saving for a long time, and I pulled fabrics from my stash to coordinate - teal grunge, purple-pink batik prints, and a long-hoarded piece of yellow print Japanese fabric I purchased in 2014 (which I love and cannot find now!) The inside fabric is Urban Garden by Alexander Henry. I love the funky vibe of the fabrics.

Inside are custom-sized pockets for my glasses, pen, keys, and iPhone. I put them a little too low and will make them closer to the top next time.

The bag is wider at the top and finished at 13 inches tall by 18 inches wide at the top and 13 inches wide at the bottom. I purchased a magnetic snap closure for it but decided against using it for this bag.

I already have plans for another bag and although I love this one, I might make a few alterations and add interfacing to help hold the shape.

Thursday, March 9, 2017

Sewcial Bee Sampler Block #6 - The Seasons


It is already week #6 of the Sewcial Bee Sampler Sew-Along, sponsored by Sharon Holland or Maureen Cracknell. I am enjoying this sew-along more than any other in which I have participated and look forward each Wednesday to seeing the pattern for the new block. The blocks have been simple to sew, and I usually spend more time choosing fabric than sewing.


I am getting a real work-out in HSTs (half-square triangles) and even with careful cutting and sewing there are still a few mis-matched points. I am trying to have a more relaxed attitude about that, but if it bothers me too much, I will take out stitches and redo until I get it right.


I still haven't decided on a fabric for framing each block, and I keep going back to this Kona. There are going to be a lot of bright colors in this quilt, and the gray might be a nice neutral contrast. I would like to make a final decision soon so I don't have to "catch up" on framing each block. The sashing will be a light cream.

Download instructions for this block as well as for all the blocks is here. If you are on Instagram, search for #sewcialbeesampler for an amazing display of all the blocks.

Tuesday, March 7, 2017

Hello, Bear Toddler Quilt Finish

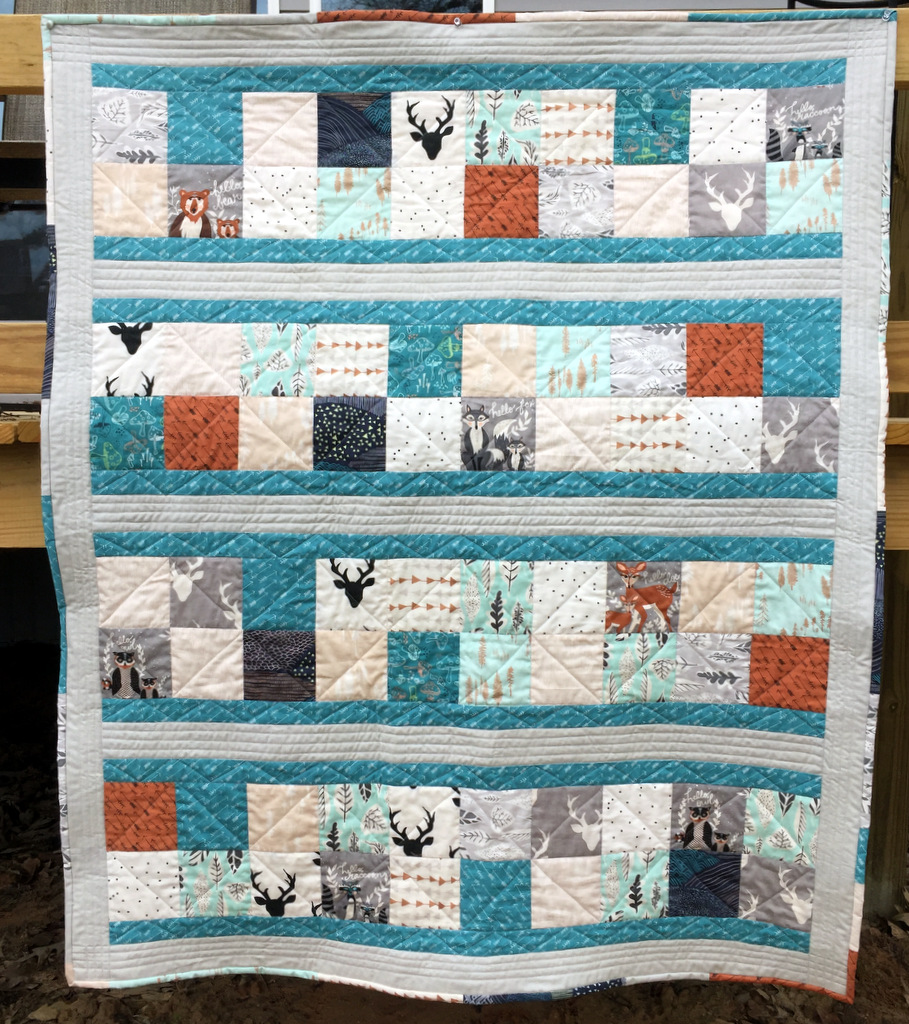
The quilt for my 3-year old great-great nephew is complete! His name is River, and when he was born my great-niece sent me (at my request) photos of his room, which featured a neutral woodsy, nature decor. I purchased a fat quarter bundle of Hello, Bear (by Bonnie Christine for Art Gallery Fabrics) - a perfect match for his room - but only recently picked out a pattern and started cutting. Procrastination and Distraction = my enemies!

I was attracted to the Akito pattern by Villa Rosa Designs because it allows the fabrics to shine through in a pleasing design. It was simple and fun to piece. I did some fussy cutting to show off the cute little bears, foxes, owls, raccoons, and deer. I used a tiny gray and ecru check for the borders and sashing between the blocks. The online shop where I purchased it labeled it by Andover fabrics, and I got the last bit they had. I want more!

I pieced the backing with Hello, Bear Adventure Springs, which is teal with white arrows, and White Grunge, which has hints of mint green. I made a scrappy binding from leftover fabric.

Instead of my usual wavy lines quilting, I did a more linear design to complement the arrows.

Now I just need to clean off stray cat hairs and get it mailed!

Thursday, March 2, 2017

Sewcial Bee Sampler Block #5 - July Fourth


Week #5 of the Sewcial Bee Sampler is titled July Fourth. Although it looks complicated, it was a fun block to sew and a new-to-me way to make four Flying Geese units with no waste.


Again I used fabrics from Maureen Cracknell's gorgeous Garden Dreamer line - Twinklestar Berry and Bumble Beez. I pulled the sage-y gray fabric from my stash and don't remember what it is, but I wish I did because I want more of it.

You can find more information on the blogs of Sharon Holland or Maureen Cracknell, download instructions for this block here, and for all the blocks here. If you are on Instagram, search for #sewcialbeesampler to see how many variations there are for these blocks!


I am almost done with Hello, Bear quilt for my great-niece's little boy. The quilting is done, and today I am finishing it with a scrappy binding.


BUT I'm not sure Jack wants to give it up!