Showing posts with label 2017 Finish. Show all posts

Friday, December 29, 2017

Toddler Apron and Good-Bye 2017


As one last finish for 2017 I made my 20-month old granddaughter an apron for Christmas. I found a pattern but pretty much cut it "my own way" as I texted my daughter to measure certain widths and lengths on Delaney. So it was guesswork that turned out well! Delaney would not be still for a photo - lol! The few pictures I did take of the apron did not turn out well because we have had cloudy weather for sooooo long.

I used a "Darling Little Dickens" mini-charm pack and loved the soft pastel greens, peaches, aquas, and taupes.


The binding/tie was a bright green print from the Gooseberry line.


And the back was a cute little Japanese print by Megumi Sakakibara that coordinated nicely.


Here is Delaney's initial "D" on the pocket. My Janome does not have embroidery capabilities, but it has a cross-stitch that I used to outline the D. (2018 goal: new sewing machine!)


We had a wonderful Christmas filled with food, fun, and laughter. Here is a Christmas day photo of our "original four. It is rare to get a picture of just the four of us!

As 2017 draws to a close, with several quilting and sewing projects in various stages of (un)completion, as well as many plans - quilting, gardening, bread-baking, house projects, etc - for 2018, I find myself more and more unmotivated to blog. I'm not quite ready to give up blogging, but if you don't see anything here, look for me on Instagram.

Happy New Year!

Monday, August 21, 2017

Cat Nap Quilt


This Cat Nap quilt for our granddaughter's 14th birthday was created around a Cats in the Library panel made by Timeless Treasures. She loves kitties and recently rescued a cat from a shelter, so I wanted to make her a quilt to cuddle with "Griffin" the kitty.

Griffin

Close-up of some of the cat panel blocks


I was able to cut 8 blocks from the cat panel and had originally intended to make these Scrappy Susannah blocks to surround them, but I decided to do regular 16-patch blocks instead. In retrospect I wish I had done the Scrappy Susannah blocks or at least placed the white squares inside the blocks for more interest, but I still like the way it turned out.


For the back I framed blocks of leftover fabric in navy.


The quilt shrunk 2 inches in width and 4 inches in length when I washed it


Quilt size: 46w X 61h
Fabrics: Pool and Moutarde Grunge, an orange Grunge (Burnt Orange?), PB&J Daisy Mae Picnic in floral yellow, and white and navy grunge-like fabrics purchased at Hobby Lobby (I will find the names and update them here). The white reminded me of Basic Grey Grunge White Paper, but it is soft and almost gauze-like.
Backing: Mostly white "grunge" by Hobby Lobby plus leftover fabrics from blocks
Binding: Navy "grunge" by Hobby Lobby
Quilting: Diagonal straight lines on two corners and wavy lines for the remainder
Thread: Superior So Fine #50 Genoa Gray
Things I Learned: Washing a quilt prior to giving it away is important. I haven't washed a quilt prior to gifting it since 2013, when the bright fabrics on a quilt I intended to give away "bled" badly onto the white fabric. I kept the quilt and tried in vain to remove all the spots of color. I don't even notice the spots now! So I washed this quilt first and was very happy with the result. There was "no bleeding"! The navy softened to a dark faded denim-look after laundering and the quilt became very soft and snugly.

Friday, August 4, 2017

Scrappy American Flag Finish

The Scrappy American Flag was completed a couple of weeks ago, but I am late getting a blog post up!


I have yet to sew a hanging sleeve on the back, and it is currently "tacked" onto the kitchen wall.


Many thanks to Julia at Running Stitch Quilts for a great pattern! And thanks to Amy of Diary of a Quilter for her American Flag Quilt tutorial (another great pattern!), where I learned the proper way to hang an American flag vertically is with the blue/star field in the upper left corner.


Jack loves the new backdrop to his handsome-ness!


I primarily used 2-1/2 inch scraps of Moda's Freedom by Sweetwater and filled in with scraps from stash. I loved fussy-cutting a couple of my favorite states!


The back is from a layer cake of Moda Independence Trail.


Binding is a nice navy grunge-ish fabric I found at Hobby Lobby!


Currently working on a quilt for our soon-to-be 14 year-old granddaughter!

Wednesday, May 3, 2017

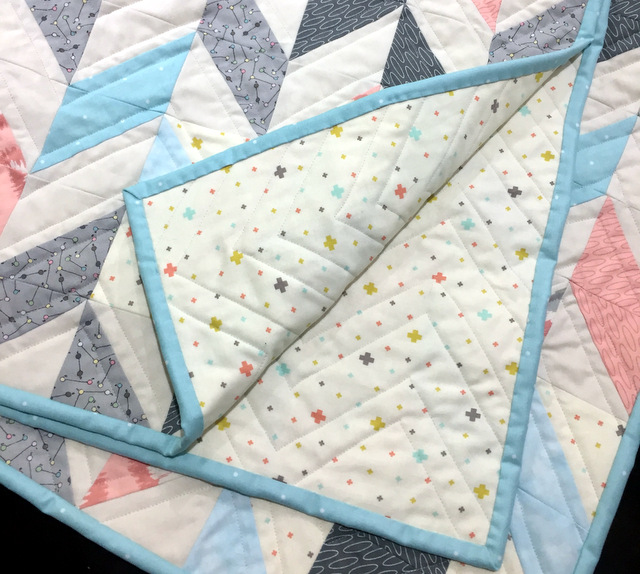
Herringbone Baby Quilt


After my great-niece received the quilt for my great-great nephew River, she asked if I would make a quilt for her to give to a friend that was having a baby girl this month. Of course I would! After a few back and forth emails about patterns, she chose the herringbone pattern. Her friend's nursery decor is blush, cream, aqua, grey, and touches of gold with flamingos, pineapples, giraffes, and other animals, but I found it difficult to find coordinating fabrics and colors with those elements, so I decided to just stick with the colors she wanted.

I looked at several patterns for herringbone quilts and finally decided to use a
YouTube video tutorial by Jenny of Missouri Star Quilt Company to make HSTs (half square triangles) that are sewn together for the "chevron" shapes. Her method is to place two squares wrong sides together and sew a 1/4-inch seam completely around them, then cut them into quarters. This is the simplest and fastest method I've used, and I really enjoyed it! I included a few of my photos below. Click on the photos for larger detail.

Take two squares fabric, place right sides together (mine were 5-inch squares)

Sew 1/4 inch seam all the way around. Jenny sews "right off the edge"
instead of pivoting, so I did that also.

Take the sewn squares, place ruler on diagonal, and cut. Without shifting,
turn squares and cut on diagonal again. (A rotating cutting mat helps!)

The yield is four HSTs. Press seams toward darker fabric;
cut off "tips" (mine are still in place in the photo!)

Rotate HSTs to form herringbone pattern.

I made about 24 each of six different prints and one solid for the HSTs (I had several leftovers). I arranged them all on my design board so that one vertical row was "up" and the other vertical row was "down". Then I numbered each row and sewed them by horizontal row. Jenny sewed hers by vertical row, so the choice is whatever makes the most sense to you!


I tried shopping online for the combination of colors but finally ended up at my LQS to ask for help. I was directed to the Serenity fabric line by Amy Ellis for Moda and ended up buying yardage as well as the layer cake (which was 50% off!) I had not seen this line before, and I really love it.


Backing - Desert Bloom - Mesa Ivory by Sherri McConnell

Diagonal quilting to showcase the fabric and herringbone pattern


Quilt size: 39w X 43h
Fabrics: Serenity, Marbles Mist, Meow or Never, Bella Ivory - all by Moda
Backing: Desert Bloom Mesa by Moda
Binding: Aqua with white polka dots by Hobby Lobby
Thread: Superior So Fine #50 Genoa Gray

TUTORIAL OUTTAKES - Kitty helper Rosie stealing an HST

Thursday, March 16, 2017

Quilted Scrappy Tote Bag

This scrappy tote bag is now my go-to shopping bag! I found the tutorial on the blog of Jedi Craft Girl.

I got the idea for scrappy panels from Andy at A Bright Corner. I love this version!

Since this was my first time making a bag I had to go slow and re-read instructions. That being said I had trouble understanding how everything went together and sewed the handles in wrong. Then I got to rip stitches - lol!

I had a piece of Echino Buck with Glasses by Etsuko Furuya for Kokka in canvas that I had been saving for a long time, and I pulled fabrics from my stash to coordinate - teal grunge, purple-pink batik prints, and a long-hoarded piece of yellow print Japanese fabric I purchased in 2014 (which I love and cannot find now!) The inside fabric is Urban Garden by Alexander Henry. I love the funky vibe of the fabrics.

Inside are custom-sized pockets for my glasses, pen, keys, and iPhone. I put them a little too low and will make them closer to the top next time.

The bag is wider at the top and finished at 13 inches tall by 18 inches wide at the top and 13 inches wide at the bottom. I purchased a magnetic snap closure for it but decided against using it for this bag.

I already have plans for another bag and although I love this one, I might make a few alterations and add interfacing to help hold the shape.

Tuesday, February 7, 2017

Baby Cloth Book


As soon as I saw that Bernie had made this cute little cloth book on Needle and Foot and she provided the link for the panel, I immediately ordered it. My granddaughter will be 10 months old this month, and this will be perfect for her. My daughter and son-in-law have two adorable dogs - a chocolate lab named Bock and a black lab named Boone. My granddaughter adores them, and they are very gentle with her grabbing their fur and ears - lol! So naturally I chose the I Ruff You panel.


Sandra Magsamen makes these panels for Studio E. The instructions are included on the panel, and the only thing I had trouble with was the placement of the ears (user error, not creator error!) The first time positioned and stitched them into place incorrectly, but after I got them right the rest of it went quickly and smoothly.

My daughter and granddaughter are coming to visit next week, so this will be ready for her to play with!

Monday, February 6, 2017

Valentine Heart Pillow


I wasn't thinking about Valentine's Day at all until I got Amy Smart's (Diary of a Quilter) newsletter and saw a tutorial for this cute little pennant heart pillow. I remembered Janine's post about "Drop Everything and Make It", so I did, and it was almost-instant gratification. In fact it took longer to pick out my fabric scraps than sewing it.


The hearts involve using a pattern for the preferred shape, backing them with fusible interfacing, stitching them into place, and connecting them with embroidery thread. It was easy and fun.


Jack always wants to make sure my projects pass the sniff-test.


This little pillow is now on its way to my daughter's house to add to her seasonal pillow collection from Mom.