Showing posts with label patchwork. Show all posts

Wednesday, October 31, 2018

Eight Years of The Joy of Quilting


As October draws to a close, I am reminded of the start of my quilting journey in October 2010. It had its beginnings in 1982, when I had just been diagnosed with liver cancer (it turned out to be another type of liver issue, and I am still alive and healthy!!), and I wanted to experience as much of life as I possibly could. My Granny had been a quilter, I still have half a dozen or so of her hand-quilted quilts, so I decided I wanted to learn to quilt and signed up for a hand quilting class in Plano, TX. I learned to hand-piece each cut-with-scissors piece as well as hand-quilt the block. Sadly I no longer have that block, but I remember the rust, blue, and cream colors of the fabric. My children were 5 and 10, and I had to wait until my husband got home to drive to the night class, about a 15 mile drive from where we lived at the time in Richardson, TX. I remember driving to class at night blasting Michael McDonald songs - lol!


My sweet Mom at her 96th birthday party

It was October 2010 before I did anything else with quilting. My Mom passed away in September at age 98, after living with us for eight years, and I found myself with a lot of time on my hands. I decided to take a basic quilting class at Oklahoma Quilt Works in Oklahoma City. I made a 4-block wall hanging featuring four traditional blocks. The teacher was a stickler on "points", and I sewed and picked apart blocks until mine were perfect! I finished the four blocks, but it was a long time before I put the wall hanging together and quilted it. It ultimately became a Christmas table topper in 2014.

I still love the fabrics I chose in the Oklahoma City quilt shop - all from Basic Grey Fruitcake.

I know Mom and Granny would be thrilled that I finally picked up the quilting bug! It was one of the best decisions I ever made. You can read more in depth about my quilting journey and the table topper history here.

You can see quilts I have finished, as well as other projects, in the tabs below my blog heading.

Monday, August 21, 2017

Cat Nap Quilt


This Cat Nap quilt for our granddaughter's 14th birthday was created around a Cats in the Library panel made by Timeless Treasures. She loves kitties and recently rescued a cat from a shelter, so I wanted to make her a quilt to cuddle with "Griffin" the kitty.

Griffin

Close-up of some of the cat panel blocks


I was able to cut 8 blocks from the cat panel and had originally intended to make these Scrappy Susannah blocks to surround them, but I decided to do regular 16-patch blocks instead. In retrospect I wish I had done the Scrappy Susannah blocks or at least placed the white squares inside the blocks for more interest, but I still like the way it turned out.


For the back I framed blocks of leftover fabric in navy.


The quilt shrunk 2 inches in width and 4 inches in length when I washed it


Quilt size: 46w X 61h
Fabrics: Pool and Moutarde Grunge, an orange Grunge (Burnt Orange?), PB&J Daisy Mae Picnic in floral yellow, and white and navy grunge-like fabrics purchased at Hobby Lobby (I will find the names and update them here). The white reminded me of Basic Grey Grunge White Paper, but it is soft and almost gauze-like.
Backing: Mostly white "grunge" by Hobby Lobby plus leftover fabrics from blocks
Binding: Navy "grunge" by Hobby Lobby
Quilting: Diagonal straight lines on two corners and wavy lines for the remainder
Thread: Superior So Fine #50 Genoa Gray
Things I Learned: Washing a quilt prior to giving it away is important. I haven't washed a quilt prior to gifting it since 2013, when the bright fabrics on a quilt I intended to give away "bled" badly onto the white fabric. I kept the quilt and tried in vain to remove all the spots of color. I don't even notice the spots now! So I washed this quilt first and was very happy with the result. There was "no bleeding"! The navy softened to a dark faded denim-look after laundering and the quilt became very soft and snugly.

Friday, August 4, 2017

Scrappy American Flag Finish

The Scrappy American Flag was completed a couple of weeks ago, but I am late getting a blog post up!


I have yet to sew a hanging sleeve on the back, and it is currently "tacked" onto the kitchen wall.


Many thanks to Julia at Running Stitch Quilts for a great pattern! And thanks to Amy of Diary of a Quilter for her American Flag Quilt tutorial (another great pattern!), where I learned the proper way to hang an American flag vertically is with the blue/star field in the upper left corner.


Jack loves the new backdrop to his handsome-ness!


I primarily used 2-1/2 inch scraps of Moda's Freedom by Sweetwater and filled in with scraps from stash. I loved fussy-cutting a couple of my favorite states!


The back is from a layer cake of Moda Independence Trail.


Binding is a nice navy grunge-ish fabric I found at Hobby Lobby!


Currently working on a quilt for our soon-to-be 14 year-old granddaughter!

Wednesday, July 12, 2017

Scrappy American Flag Quilt Flimsy

Flimsy complete

Back in June I started looking for a flag wall hanging for one of my kitchen walls. I wanted our American flag represented somewhere in the house; plus I knew the colors would coordinate with my kitchen very nicely. When I found a link to Julie's wall hanging at Running Stitch Quilts, I knew it was the one. I love it! (Be sure and click on the link to see her gorgeous version!) She is also on Instagram @runningstitchquilts

Pre-piecing

She was in the process of making a free pattern, but I was impatient. So I studied hers closely and started cutting 2.5 inch scraps. She was in the midst of a move but still managed to create the pattern. When she offered it free for one week only just for signing up for her newsletter, I grabbed it! (Although the link is still on her blog, I'm not sure if it's still available.) Her pattern is very well written and beautifully illustrated and having it really helped answer some of the questions I had.

I want a blue denim-ish fabric for the back and have considered various fabrics but of course none is in my stash! I also want to sew in a hanging sleeve.

Space above bookshelf (with Katy Kitty) is 30 x 46

The quilt will finish at about 26 x 46, and I may have to get a new bookshelf for my cookbooks if it doesn't fit above it. But the kitties will insist it has a nice perch for them!

This post is linked to Mama Spark's World WIPS With Friends

Wednesday, June 21, 2017

Patchwork American Flag - New Projects and Old


There is a wall space in my kitchen that just begs for something quilted, and I think this patchwork flag is going to fit nicely. Julie of Running Stitch Quilts posted her Scrappy American Flag Quilted Wall Hanging, and this is my version.

Julie is working on a pattern, but I am impatient and worked it out myself using a photo of an American flag and a photo of Julie's wall hanging. She used Freedom by Sweetwater, so I ordered six mini charm packs from Fat Quarter Shop and got them for $4.48 each. I picked out the ones that were in the right color scheme, and now I have enough left over for other projects!


Yesterday I was looking for some fabric I had purchased back in early 2016 for a quilt called "Tapestry" that is in the Fat Quarter Style book. I found the fat quarter bundle, but I am missing the yardage I purchased for this project. It is possible that I used it as cushion for packing something else when we moved last July, but I've looked in as many unpacked boxes as seem reasonable, and I still can't find it. I am hoping it is hiding somewhere I haven't looked yet, because it makes me sad.


Farm Girl Vintage blocks today

The start of Farm Girl Vintage in May 2015

However, while I was looking I came across the Farm Girl Vintage blocks I started in May 2015, and I happily put them on the design board to see how they all look together. I started off making 12-inch blocks before I realized that if I wanted to use all 45 blocks in a quilt, I needed the 6-inch blocks. When I lay out the blocks for a quilt I will try to have a mix of both. I still have about 10 blocks to go, so I pulled and cut fabric for them and will try to finish those up this month.


I have to include photos of some of the harvest of our first garden here on our acreage. It was an experiment to test the soil, and it is a success. We have 7 tomato plants, and they are loaded with juicy beefsteaks! We have 2 squash plants, 4 pepper plants, and onions that have produced, and corn, okra, and green beans that haven't matured yet. We can't wait to increase the size of the garden and quantity of veggies next spring.

Thursday, February 4, 2016

The Case of the Disappearing 4-Patch


This really is a post about a Disappearing 4-Patch block, but I couldn't resist making a mystery out of it by taking liberties with the cover of The Secret of the Old Clock! I discovered Nancy Drew books when I was 10, and my friends and I pretended to be the characters in the mysteries. I sold chicken eggs to buy the newest books at the tiny bookstore in my small town. And to this day I get a thrill of excitement when I see those old book covers. My favorites were The Password to Larkspur Lane and The Whispering Statue.

Since I first started quilting I've been fascinated with "disappearing" 4-patch, 9-patch, and 16-patch blocks and their many variations, so this "disappearing 4-patch with a twist" on Pinterest was hard to resist. I found the tutorial on the blog of What Comes Next?. I decided to try my own tutorial, but you can refer to the original tutorial if you get confused. Click on the pictures for a closer look.

Contrasting colors work best. In keeping with the "mystery" theme, I chose two light and two dark 5-inch charm squares from Moda's Get A Clue With Nancy Drew collection.

Sew 4-patch together as normal


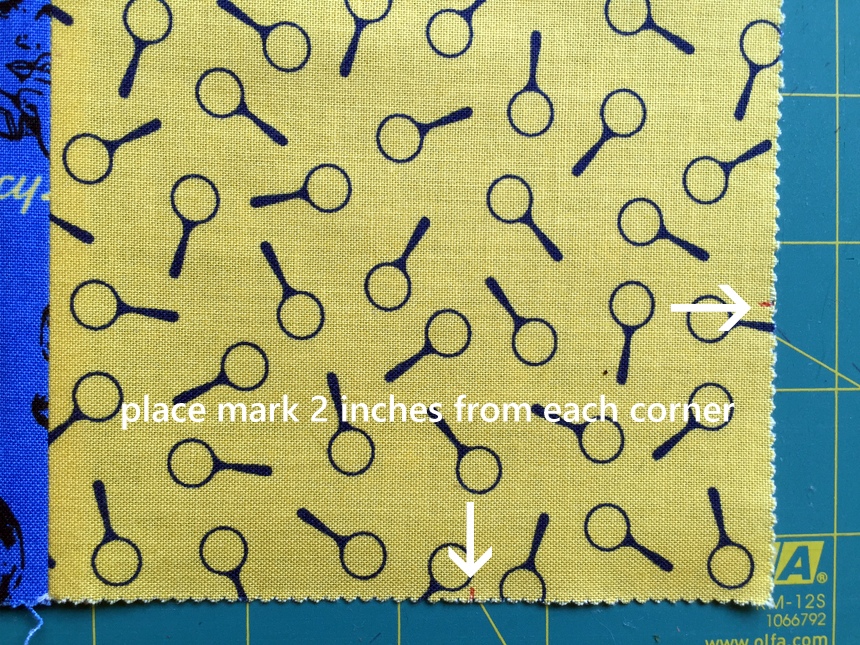
Place a mark 2 inches from each of the 4 corners


Using the marks as a guide, place ruler as indicated and make diagonal cuts as pictured.
A rotating cutting board is helpful!


The cuts will yield pieces like this


Here is where the "twist" comes into play:
In the upper right corner, switch "a" with "b"
In the lower left corner switch "c" with "d"


Now take the center piece and give it a turn


When the "twists" are completed, your sections will look like this


Each 3-piece section is sewn together


The three sections are sewn together, matching the center seams


Trim the block


My block finished at 8 inches square

You can use different sizes of squares and also make your diagonal cuts at measurements other than 2 inches. The variations are endless!


I am sharing this post with Val's Quilting Archives and Life a Colorful Life Really Random Thursday.

Val's Quilting Studio

Thursday, April 16, 2015

Reverse Rainbow Starburst Complete


Well I’m back. I closed my blog two months ago to deal with an unfortunate and devastating event in our lives and only recently felt a renewed interest in quilting. This Reverse Rainbow Star quilt was waiting for me to sandwich, quilt, and bind it, and I spent a couple days losing myself in the familiar and comforting motions of the quilt process.


Using FlutterKat's tutorial, I started these scrappy 16-patch blocks for the Sweet 16 Quilt-along 2015 on Sarah’s blog. I still haven’t decided where this quilt will go, but for now I’m enjoying the bright colors of so many beloved fabrics. Four months into my moratorium on purchasing fabric, I'm happy to say this quilt was made entirely from my stash.


The back is anchored by a large 16-patch that reflects the arrangement of color blocks on the front. I almost like the back more than the front.


My quilting was a mix of curves, zig-zags, and straight lines.


With all the color going on, white seemed a good choice for the final border and binding.

Thanks to my sweet husband for being my quilt model.

UPDATE 4/21/15: Today I found out my niece has cancer and I've decided to sent this quilt to her. Hopefully it will give her some comfort.