Friday, December 29, 2017

Toddler Apron and Good-Bye 2017


As one last finish for 2017 I made my 20-month old granddaughter an apron for Christmas. I found a pattern but pretty much cut it "my own way" as I texted my daughter to measure certain widths and lengths on Delaney. So it was guesswork that turned out well! Delaney would not be still for a photo - lol! The few pictures I did take of the apron did not turn out well because we have had cloudy weather for sooooo long.

I used a "Darling Little Dickens" mini-charm pack and loved the soft pastel greens, peaches, aquas, and taupes.


The binding/tie was a bright green print from the Gooseberry line.


And the back was a cute little Japanese print by Megumi Sakakibara that coordinated nicely.


Here is Delaney's initial "D" on the pocket. My Janome does not have embroidery capabilities, but it has a cross-stitch that I used to outline the D. (2018 goal: new sewing machine!)


We had a wonderful Christmas filled with food, fun, and laughter. Here is a Christmas day photo of our "original four. It is rare to get a picture of just the four of us!

As 2017 draws to a close, with several quilting and sewing projects in various stages of (un)completion, as well as many plans - quilting, gardening, bread-baking, house projects, etc - for 2018, I find myself more and more unmotivated to blog. I'm not quite ready to give up blogging, but if you don't see anything here, look for me on Instagram.

Happy New Year!

Tuesday, September 19, 2017

Flower Power, Texas Flag Quilt, and A Break


I've been working on a pattern I saw on Instagram and immediately loved. It is called Flower Power by Kelli Fannin and is available for purchase here. I am using a fat quarter bundle of Enchanted Pond that I purchased some time ago and this will become a lap-sized quilt for my sister-in-law! I put a 5-inch charm square in the photo so you can see how big the blocks are at 16-1/2 inches square. The blocks go together quickly, and I am really enjoying it!


I have set the Flower Power project aside to start work on a surprise for my husband - a Texas Flag Quilt or Lone Star Flag quilt. He is out of town until Thursday, Sept 28, and I have other plans all weekend, so I need to get it done quickly. The pattern is by Lisa at Things Here Lately, and it is available in PDF here. I spent the entire afternoon laying it out on the design board, and today I will start piecing. I love scrappy flag patterns, and I am excited about this one. I can't wait to see his face when he sees it across our new slate-blue bedspread!

I will be taking a little break from the blog. I know you're thinking "A break from what? She hardly ever posts!" Lol! I plan to be back soon with some Christmas projects.

Monday, August 21, 2017

Cat Nap Quilt


This Cat Nap quilt for our granddaughter's 14th birthday was created around a Cats in the Library panel made by Timeless Treasures. She loves kitties and recently rescued a cat from a shelter, so I wanted to make her a quilt to cuddle with "Griffin" the kitty.

Griffin

Close-up of some of the cat panel blocks


I was able to cut 8 blocks from the cat panel and had originally intended to make these Scrappy Susannah blocks to surround them, but I decided to do regular 16-patch blocks instead. In retrospect I wish I had done the Scrappy Susannah blocks or at least placed the white squares inside the blocks for more interest, but I still like the way it turned out.


For the back I framed blocks of leftover fabric in navy.


The quilt shrunk 2 inches in width and 4 inches in length when I washed it


Quilt size: 46w X 61h
Fabrics: Pool and Moutarde Grunge, an orange Grunge (Burnt Orange?), PB&J Daisy Mae Picnic in floral yellow, and white and navy grunge-like fabrics purchased at Hobby Lobby (I will find the names and update them here). The white reminded me of Basic Grey Grunge White Paper, but it is soft and almost gauze-like.
Backing: Mostly white "grunge" by Hobby Lobby plus leftover fabrics from blocks
Binding: Navy "grunge" by Hobby Lobby
Quilting: Diagonal straight lines on two corners and wavy lines for the remainder
Thread: Superior So Fine #50 Genoa Gray
Things I Learned: Washing a quilt prior to giving it away is important. I haven't washed a quilt prior to gifting it since 2013, when the bright fabrics on a quilt I intended to give away "bled" badly onto the white fabric. I kept the quilt and tried in vain to remove all the spots of color. I don't even notice the spots now! So I washed this quilt first and was very happy with the result. There was "no bleeding"! The navy softened to a dark faded denim-look after laundering and the quilt became very soft and snugly.

Friday, August 4, 2017

Scrappy American Flag Finish

The Scrappy American Flag was completed a couple of weeks ago, but I am late getting a blog post up!


I have yet to sew a hanging sleeve on the back, and it is currently "tacked" onto the kitchen wall.


Many thanks to Julia at Running Stitch Quilts for a great pattern! And thanks to Amy of Diary of a Quilter for her American Flag Quilt tutorial (another great pattern!), where I learned the proper way to hang an American flag vertically is with the blue/star field in the upper left corner.


Jack loves the new backdrop to his handsome-ness!


I primarily used 2-1/2 inch scraps of Moda's Freedom by Sweetwater and filled in with scraps from stash. I loved fussy-cutting a couple of my favorite states!


The back is from a layer cake of Moda Independence Trail.


Binding is a nice navy grunge-ish fabric I found at Hobby Lobby!


Currently working on a quilt for our soon-to-be 14 year-old granddaughter!

Wednesday, July 12, 2017

Scrappy American Flag Quilt Flimsy

Flimsy complete

Back in June I started looking for a flag wall hanging for one of my kitchen walls. I wanted our American flag represented somewhere in the house; plus I knew the colors would coordinate with my kitchen very nicely. When I found a link to Julie's wall hanging at Running Stitch Quilts, I knew it was the one. I love it! (Be sure and click on the link to see her gorgeous version!) She is also on Instagram @runningstitchquilts

Pre-piecing

She was in the process of making a free pattern, but I was impatient. So I studied hers closely and started cutting 2.5 inch scraps. She was in the midst of a move but still managed to create the pattern. When she offered it free for one week only just for signing up for her newsletter, I grabbed it! (Although the link is still on her blog, I'm not sure if it's still available.) Her pattern is very well written and beautifully illustrated and having it really helped answer some of the questions I had.

I want a blue denim-ish fabric for the back and have considered various fabrics but of course none is in my stash! I also want to sew in a hanging sleeve.

Space above bookshelf (with Katy Kitty) is 30 x 46

The quilt will finish at about 26 x 46, and I may have to get a new bookshelf for my cookbooks if it doesn't fit above it. But the kitties will insist it has a nice perch for them!

This post is linked to Mama Spark's World WIPS With Friends

Sunday, June 25, 2017

Fresh Tomato Pie


I'm not sure how I missed eating a tomato pie in my lifetime, but now that I have eaten one, I love it! This pie makes good use of summer tomatoes. It's a little like eating fresh tomato pizza - the cheese mixture is like a hot cheese dip, and the tomatoes retain their shape, firmness, and juicy, tangy sweetness. When I first thought "tomato pie" I imagined it would be watery, but it isn't. It smells wonderful while baking and tastes good freshly baked as well as when it has cooled down!


I requested the recipe from @filisfay after she posted a photo of hers on Instagram. I halved the recipe and made a biscuit-type crust, added green onions and lemon thyme from my garden, and used a bit of pepper jack cheese along with cheddar. I'm thinking that additions of Gruyere as well as bacon would be good!

Fresh Tomato Pie
by “Filisfay” on Instagram, tweaked by me

Pre-baked pie crust (I didn't pre-bake mine and it was still great)
5 tomatoes, sliced 1/2 inch thick (I used 2 big beefsteaks for my 8-inch pie plate
Salt
1/4 cup fresh chopped basil or other fresh herb
2 cups shredded cheese, any variety
1 cup mayonnaise
1 teaspoon garlic powder
1/2 cup diced sweet or green onions (my addition)

Slice tomatoes, place in a colander, sprinkle salt over them, and let stand 10-15 minutes. (This is supposed to "pull water out" of the tomatoes") Blot tomatoes with paper towel and place in pie crust. Add basil on top of tomatoes. Mix together cheese, mayonnaise, onions, and garlic powder, drop in dollops over tomatoes and basil, and spread evenly, covering tomatoes. Bake at 350 degrees on bottom rack until cheese is bubbly and a little brown, about 30 minutes. Let stand at least 10 minutes before slicing. Store any leftovers in refrigerator or freeze in individual slices.

Pie Crust
1 cup self-rising flour
2 tablespoons shortening
1 tablespoon butter
1/4 cup plus 1 tablespoon milk
Cut shortening and butter into flour. Add milk & stir lightly with fork. Turn into floured board and knead a few times. Roll into circle for 8 or 9 inch pie.

I realize this may not look as good as it tastes, but trust me on this!

Wednesday, June 21, 2017

Patchwork American Flag - New Projects and Old


There is a wall space in my kitchen that just begs for something quilted, and I think this patchwork flag is going to fit nicely. Julie of Running Stitch Quilts posted her Scrappy American Flag Quilted Wall Hanging, and this is my version.

Julie is working on a pattern, but I am impatient and worked it out myself using a photo of an American flag and a photo of Julie's wall hanging. She used Freedom by Sweetwater, so I ordered six mini charm packs from Fat Quarter Shop and got them for $4.48 each. I picked out the ones that were in the right color scheme, and now I have enough left over for other projects!


Yesterday I was looking for some fabric I had purchased back in early 2016 for a quilt called "Tapestry" that is in the Fat Quarter Style book. I found the fat quarter bundle, but I am missing the yardage I purchased for this project. It is possible that I used it as cushion for packing something else when we moved last July, but I've looked in as many unpacked boxes as seem reasonable, and I still can't find it. I am hoping it is hiding somewhere I haven't looked yet, because it makes me sad.


Farm Girl Vintage blocks today

The start of Farm Girl Vintage in May 2015

However, while I was looking I came across the Farm Girl Vintage blocks I started in May 2015, and I happily put them on the design board to see how they all look together. I started off making 12-inch blocks before I realized that if I wanted to use all 45 blocks in a quilt, I needed the 6-inch blocks. When I lay out the blocks for a quilt I will try to have a mix of both. I still have about 10 blocks to go, so I pulled and cut fabric for them and will try to finish those up this month.


I have to include photos of some of the harvest of our first garden here on our acreage. It was an experiment to test the soil, and it is a success. We have 7 tomato plants, and they are loaded with juicy beefsteaks! We have 2 squash plants, 4 pepper plants, and onions that have produced, and corn, okra, and green beans that haven't matured yet. We can't wait to increase the size of the garden and quantity of veggies next spring.

Monday, May 29, 2017

Memorial Day 2017


Remembering today and every day my dear family
Daddy, Mom, and my brothers Jerry and Danny.

Monday, May 15, 2017

Pralines, Pigs, and Stack Quilt Pattern


Praline making has always been a specialty of my husband, but over the years he has gradually entrusted me with his recipe. Although his recipe is pretty much perfect, I am not, so there are times that "soft-ball stage" becomes either too gooey or too hard. Since his Mom has a bit of dementia, doesn't like to shop, and loves sweets, we decided to make pecan pralines for her Mother's Day gift. And this time they turned out perfectly. She loves them! These stick pretty close to my earlier versions (here and here); I just added more pecans, less butter, more vanilla - I tweak a little each time! Be forewarned: I guarantee a sugar high.

Pecan Pralines
Yields about 2 dozen

2-1/2 cups firmly packed brown sugar (I use dark)
1/2 cup white sugar
1 cup half and half (can use evaporated milk)
2 tablespoons corn syrup
1/2 stick salted* butter (4 tablespoons)
2 cups whole or coarsely chopped toasted pecans
2 teaspoons vanilla
*If you don't use salted butter, add 1/8 teaspoon salt

In 3-quart saucepan, bring first 3 ingredients to a boil over medium heat, stirring constantly. Reduce heat to medium low and cook, stirring occasionally, until candy thermometer registers 238 – 240 degrees, or soft-ball stage.

Remove pan from heat and add butter; do not stir. Let stand until candy thermometer reaches 150 degrees. Add pecans and vanilla.

Using wooden spoon, stir vigourously until candy begins to thicken. This may take awhile. Drop mixture with a tablespoon onto waxed paper. Let stand until firm.

(If mixture thickens too quickly, put pan on low heat and stirs until mixture warms and become more liquid again.)


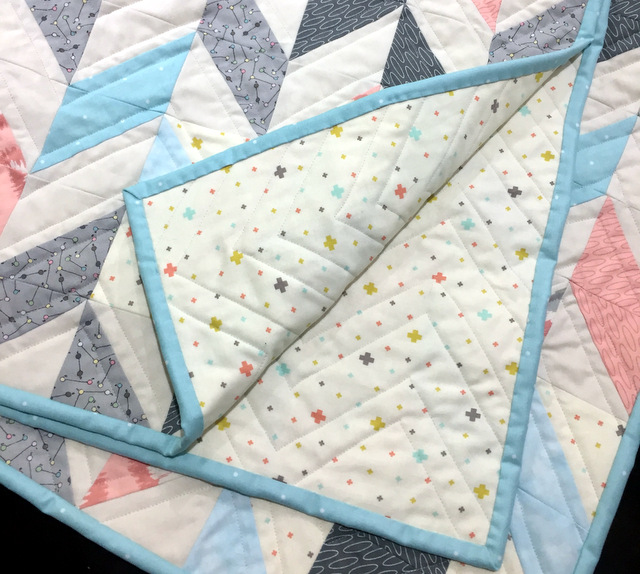
You know how you see an Instagram photo and making it becomes an obsession? That happened to me with Modern Handcraft's "Stack Quilt". I really don't consider myself a modern gal, but I am finding more and more that modern patterns appeal to me. In this case I was thrilled when the pattern was released, AND I received a 20% discount by using a code that was sent for signing up for Nicole's newsletter. I love the blue denim version, as pictured here, but you can make the denim part white, and there is a whole new look. The discount is good through Wednesday, May 17, so if you are interested go to her website and sign up for her newsletter!


"In other news", we now live in an area that is often beset with feral hogs. I have seen them three times in the yard during the day. They always take off running when I clap my hands. But recently they have been rooting in the yard at night (see picture above). We live on 5 acres with my husband's sister, mother, and nephew, and their yard is also being torn up. The hogs are looking for grubs, roots, bulbs, mushrooms, and grass, and they leave holes in the ground and larger areas that look like they have been roto-tilled. One night my nephew forgot to burn the trash, and the hogs ravaged two trash bags. Feral hogs are not protected, but we really don't want to pay to trap them and have someone remove them, nor do we want to start shooting at them at night (not a good time to shoot a gun). So we are exploring different ways to discourage them. Ah, the joys of country living!

Wednesday, May 3, 2017

Herringbone Baby Quilt


After my great-niece received the quilt for my great-great nephew River, she asked if I would make a quilt for her to give to a friend that was having a baby girl this month. Of course I would! After a few back and forth emails about patterns, she chose the herringbone pattern. Her friend's nursery decor is blush, cream, aqua, grey, and touches of gold with flamingos, pineapples, giraffes, and other animals, but I found it difficult to find coordinating fabrics and colors with those elements, so I decided to just stick with the colors she wanted.

I looked at several patterns for herringbone quilts and finally decided to use a
YouTube video tutorial by Jenny of Missouri Star Quilt Company to make HSTs (half square triangles) that are sewn together for the "chevron" shapes. Her method is to place two squares wrong sides together and sew a 1/4-inch seam completely around them, then cut them into quarters. This is the simplest and fastest method I've used, and I really enjoyed it! I included a few of my photos below. Click on the photos for larger detail.

Take two squares fabric, place right sides together (mine were 5-inch squares)

Sew 1/4 inch seam all the way around. Jenny sews "right off the edge"
instead of pivoting, so I did that also.

Take the sewn squares, place ruler on diagonal, and cut. Without shifting,
turn squares and cut on diagonal again. (A rotating cutting mat helps!)

The yield is four HSTs. Press seams toward darker fabric;
cut off "tips" (mine are still in place in the photo!)

Rotate HSTs to form herringbone pattern.

I made about 24 each of six different prints and one solid for the HSTs (I had several leftovers). I arranged them all on my design board so that one vertical row was "up" and the other vertical row was "down". Then I numbered each row and sewed them by horizontal row. Jenny sewed hers by vertical row, so the choice is whatever makes the most sense to you!


I tried shopping online for the combination of colors but finally ended up at my LQS to ask for help. I was directed to the Serenity fabric line by Amy Ellis for Moda and ended up buying yardage as well as the layer cake (which was 50% off!) I had not seen this line before, and I really love it.


Backing - Desert Bloom - Mesa Ivory by Sherri McConnell

Diagonal quilting to showcase the fabric and herringbone pattern


Quilt size: 39w X 43h
Fabrics: Serenity, Marbles Mist, Meow or Never, Bella Ivory - all by Moda
Backing: Desert Bloom Mesa by Moda
Binding: Aqua with white polka dots by Hobby Lobby
Thread: Superior So Fine #50 Genoa Gray

TUTORIAL OUTTAKES - Kitty helper Rosie stealing an HST